1961 Bentley S2 Restoration Project
The Sound System
Early Designs that Died
This sub-project of the Bentley's restoration has had so many twists and turns, I've decided to give it a page of its own. Based on the recommendation of Justin Jurgens, I selected Angel Hurtado of Lombards Stereo in San Luis Obispo to install a new sound system. I visited his shop in July 2021 and worked out a design. I thought we had a pretty good plan. However, plans changed over the many months that followed, while we waited for the Bentley's restoration to reach the point where installation of the sound system could begin. Truthfully, plans changed many times. If you were following this website, you know how many times. I'd settle on "the perfect system" only to become dissatisfied with it and revise it, over and over. Angel was patient and easy to work with. He's a true professional in his field.

The first idea that came to me was to install RetroSound's Monterey head unit. Its façade is a faithful replica of the radio installed in the 1960-1962 Ford Galaxie, but inside it has modern electronics, including Bluetooth and Apple iPhone controls through a USB connection. The Monterey's look is from the right year and it would not have appeared too out of place in the Bentley's dash. However, according to Angel this head unit's digital-to-analog converter (DAC) would not reproduce my music at the level of fidelity we're aiming for.
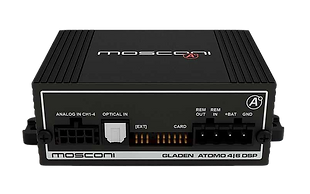
He recommended Mosconi's Advanced Multi Audio Streaming device, the AMAS 96K. It would connect to my iPhone by high-resolution Bluetooth audio streaming, then output the highest fidelity signal to the amplifier via RCAs, thanks to its high quality DAC, or it can send the pure digital signal directly to a digital signal processor (DSP) via SPDIF optical output.
It can also be hidden away, so there's nothing at all to disturb the car's original dash. This appealed to me greatly, and we started designing a system around it.
To be economical, we considered connecting it to the introductory level Atomo 4|6 DSP and adding a controller which we would mount within my reach from the driver's seat, but a call to Mosconi USA's technical advisor killed that option. The controller we wanted doesn't connect to the Atomo DSP. We'd need to upgrade to the 6|8 Pro or Aerospace DSP.
Of course, an amplifier of the same quality as the other components is called for, which brings us to the pièce de la résistance —Mosconi's Pro 5|30.
This design would have been an audiophile's dream. But, alas, the price is beyond my reach!


So I set aside the Mosconi design and went back to what I know and love—Kenwood Excelon. A DNX893S NAV/DVD receiver is in my other car. Angel said that would be okay, but he urged me to listen to a CD soundtrack played by a Pioneer with the equalizer flat and no other sound features activated. Then listen to it on a Kenwood with the same neutral settings. He promised the Pioneer's sound would be clearer and more faithful to the source, the difference being the DAC. Pioneer's outclasses Kenwood's. That's all. To make up for it, Kenwood adds some sound processing options like Stage EQ and Space Enhancer. Angel doesn't like the way those features change the sound of the recording; he prefers it as close to the original as possible, unenhanced. I quite like those features of my Kenwood, but I appreciate his advice very much.
Angel said he'd install any equipment I chose and that he wasn't there to force his preferences on any customer (such a professional!) So I looked at Pioneers as well as Kenwoods. I came very close to selecting the Pioneer AVH-1550NEX Multimedia DVD Receiver. It had everything except navigation. The AVIC-W6600NEX adds that, but the price jumps a lot higher, of course.
In the end, I love my Kenwood's features so much I decided to put one in the Bentley, too. The sensible choice was the Kenwood eXelon DDX-6906S DVD Receiver, which lacks navigation. I was seriously tempted by the top-of-the-line Kenwood eXelon Reference DNX-997XR Navigation DVD Receiver with Bluetooth and HD Radio. I like Garmin's GPS satellite navigation, and wireless Apple CarPlay would have been very convenient for backseat passengers to use.
Since I was going to install a Kenwood receiver, I decided to add a backup camera. The DNX997XR can handle an HD camera (it actually has four camera inputs), so I picked out the matching Kenwood CMOS-740HD backup camera. This would have helped immensely with parallel parking, as the Bentley is a bit ponderous.
Interestingly, contemporary Rolls-Royce and Bentley marketing literature claims the Silver Cloud and Bentley S Series are easy to drive and park, in a marked departure from its earlier limousines, which required professional chauffeur service de rigueur. Seeking higher sales, the company democratized its flagship. One flyer even depicts a woman driver (imagine that!) "Don't be intimidated in the least," the ad insinuates to its post-War male target audience, "if she can drive it, you surely can. Buy one!" Sadly, by my own experience I learned it is not so easy to drive and park, not when compared to our 2019 Toyota Sienna, which has dimensions quite as large as the Bentley, but of course enjoys better visibility, handling, and a backup camera with parking guides.
I called Angel, who was glad to install the Kenwood of my choice, with a backup camera. A few days later, though, he called me back with some bad news. None of his suppliers has any of these receivers in stock! So we went back to the drawing board.
I haven't told you about the amp. During our meeting in July 2021, I told Angel there was no way I could afford the Mosconi equipment. As an alternative, he recommendedy Addictive Audio. He knew the owner personally and in fact was aware he was building a six-channel A/B amp that would be perfect for our application at a price point I would be happy with. (The picture to the right is the 5-channel version in their Pure line.) Great plan, but it was not to be! When Angel called me in early June 2022 to tell me about the lack of Kenwood or Pioneer receivers, he also said Addictive Audio could not build its amps due to the ongoing microchip shortage. We'd have to choose another amp.

Addictive Audio builds its own amps here in California using only the best quality parts (when they can get them, otherwise they won't build.)
The Final Design

Speakers
GermanMAESTRO is known for high quality German engineering and precision manufacturing. After listening to speakers in all of their lines on Lombards Stereo's sound stage, I fell in love with the Status line. Angel put a pair of SV 6509 component sets on the rear deck and two in the front doors.
One thing that sets the Status speakers apart is the 40mm / 1.6" tweeter that can be mounted on the 160mm / 6.5" woofers as composite speakers or installed elsewhere in the cabin as a component system. Angel is doing the latter. What impressed me was how the high frequencies sang but still blended beautifully into the woofers' mid-highs and mids. The Status did that better than the Epic or Concept lines. Regarding the high-end Maestro line, I have to say the sound was precise and clear but not as warm.
Subwoofer
Audiomobile has solved the problem of how to project powerful, precise bass in a very small space. Their EVO line is best for our application. Tennessee-based custom car stereo shop Sounds Good Stereo says, "The Audiomobile EVO subwoofers work in really small enclosures and still provide low-end extension that many subwoofers lack in this category." We will install a 12" sub in a custom sealed enclosure. Angel will build a false wall in the boot that will blend in. He has built false walls for other cars, held in place by magnets. You can pull down the wall and gain access to the amp and speaker. I look forward to seeing how ours turns out.


DSP
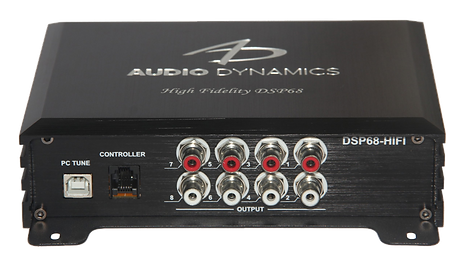
Since we couldn't get our hands on a traditional receiver from Pioneer or Kenwood, Angel suggested we take a second look at audio streaming devices. He found a fantastic DSP made by Audio Dynamics—the ADDSP68-HiFi. It has built-in hi-def Bluetooth audio streaming, apparently as good as the Mosconi AMAS 96K. And it includes a wired controller. This kit is saving us serious money, compared to buying all the Mosconi components separately!
Here are some of its features and specs.
-
31 Band Parametric EQ per Channel
-
Time Alignment
-
Memory Presets
-
64-Bit DSP resolution
-
96kHz sampling rate (aptX-HD Bluetooth)
-
6 RCA + 1 Toslink Digital + 1 Coax Digital inputs (So I could add a Kenwood receiver later. I could add a bunch of devices if I want. Insane.)
-
Control via PC connection or app (the default password to access advanced features is 24680)
Amplifier
I'm getting the Mosconi Pro 5|30! Since the Addictive Audio amp wasn't going to be built any time soon, and the Audio Dynamics DSP kit included everything we wanted at a lower price point, and Angel had the Mosconi in stock already, I decided to get it. It wasn't hard to talk myself into that. Here are some of its specs.
-
4-channel A/B Class
-
1-channel D class mono subwoofer
-
70Wx2 + 150Wx2 + 550Wx1 @ 4Ω
-
TDH < 0.045 % (CH1/2 - 1KHz) < 0.035 % (CH3/4 - 1KHz) < 1 % (CH5 - 100Hz) @ 4Ω

Hiding the Electronics
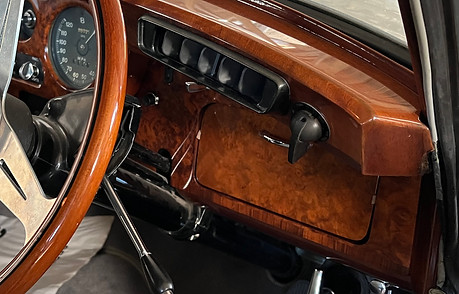
I bought a salvaged glove box door on eBay. The shop that restored my dash and other wood trim gave it the same treatment, in addition to cutting it to fit the opening of the driver's side cubby. It turned out great.
Angel figured out a way to hold it in place with magnets. It hides the DSP controller and a USB power port. I can remove the door and put it aside when I need to use the controller. I love how it turned out.
And the rear deck is pristine. You can't tell there are some amazing 6½" speakers hiding under there.


Priorities
When we first met at his shop in July 2021, Angel said, "You have to know your priorities." Is the highest priority to keep the look of the classic car? Is it to achieve audiophile sound? Is it to stay within a budget? You can't have it all, so decide what is most important, and then let that drive the other decisions.
That stopped me in my tracks. No wonder I kept going back and forth from one possibility to another, obsessing over every new piece of electronic gear I discovered. (We called such behavior "Shiny Object Syndrome" at my USCENTCOM assignment back in 2010. Looks like that term is now in widespread use.) When you don't know what your priorities are, you can't make a decision and feel settled and confident in it. So I decided to firm up my priorities. Here they are, in order:
1. Audiophile sound. Why put in the kind of money I've set aside if I won't be happy with the sound? I want it to inspire excitement and joy with pure sonic pleasure.
2. Keep the budget under control. You can spend as much as you like on car audio. There is no upper limit, and it is easy for me to get carried away in this fun pursuit of electronic bliss. But I have a family and goals for us that are more important than the Bentley and its sound system. I must not let the budget explode.
3. Preserve the original look of this fine automobile's interior. Since this is the third priority, I must allow adjustments as needed for the sound system of my choice to fit in the available space and perform up to its potential. Still, I am not going to let anything become a visual distraction. I think concealing the head unit behind a original (although slightly modified) glove box door will work well. We'll take the same approach with the dual subwoofers and amp. Angel plans to fabricate a thin enclosure for them that will fit perfectly behind the rear seat. He imagines opening the boot and not noticing anything special—it will be a false wall. He also envisions being able to access the amp and subwoofers by pulling the false wall downward, as it will be held in place with rare earth magnets. As for the front and rear woofers, we'll install them flush with the door panels and rear deck and conceal them behind fabric that blends in with the rest of the interior. The tweeters will have to be the exception — we'll have to place them for optimal sound, so there's really no way to hide them.
I think we met my #1 priority, but I'll only know for sure when I get the car back. We've certainly chosen high-end equipment, but hearing is believing. As for my #2 priority, I didn't do so well. The price tag is much higher than I wanted. If the saying "you get what you pay for" holds true, then I'll comfort myself in the knowledge that we have built a very fine system. Hopefully. And lastly, we've exceeded my expectations on my #3 priority, with the salvaged glove box door covering the cubby and the false wall in the boot. Even the speaker grills low on the front doors blend in well. I couldn't have hoped for better. Maybe #3 should have been #2.
Installation

The front doors had cubbies, but the openings weren't large enough for my 6½" woofers.
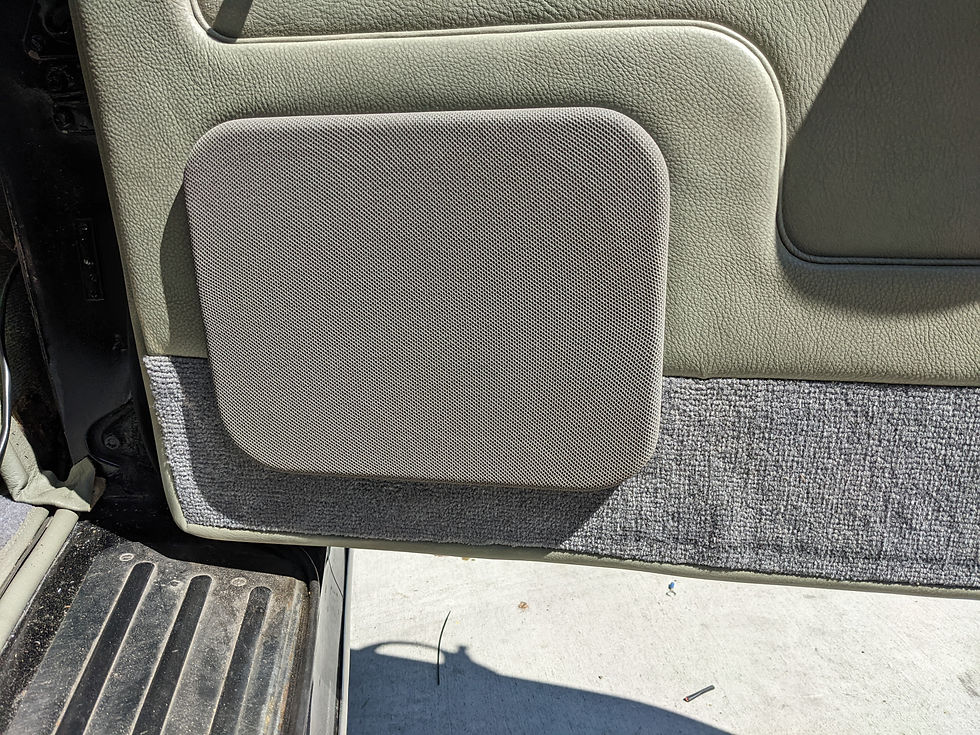
They cut the opening larger, fit the 6½" woofer in the cubby, and covered it with a grill that matches beautifully.

Audio Dynamics DSP Controller and USB charging port in the driver's side cubby
The front doors had cubbies, but the openings weren't large enough for my 6½" woofers.
Update on 25 January 2023
A few months ago, I decided I really did miss having a head unit in the Bentley. I should have known. I say that a lot, I know. I say it this time because of how much I love the sound system I installed in my other car, specifically the features of my Kenwood Excelon DNX893S NAV/DVD receiver, especially the easy-to-use 13-channel EQ and Kenwood's proprietary Stage EQ and Space Enhancer technology. So I bought a Kenwood Excelon KDC-X705 CD receiver. Now I have to install it. I'm going to try to do that myself.
Here's what I like about it (Kenwood info on Crutchfield.com):
Equalizer: The Kenwood Excelon KDC-X705 offers 8 EQ Presets for easy adjustment, a 3-band Easy EQ, a 13-band Manual EQ for customized tuning, a Drive EQ mode to overcome road noise, and a Stage EQ for better imaging. Separate EQ settings and EQ presets can be stored for each source or you can apply one EQ preset or curve to all sources.
-
Preset EQ: The integrated equalizer offers 8 preset sound modes (Rock, Pops, Easy, Top 40, Jazz, Natural, Drive EQ, or User) suitable for the music genre of your choice.
-
Easy EQ: The Easy EQ allows you to manually adjust the receiver Bass, Midrange, and Treble from 9dB to +9dB.
-
13-Band EQ: The 13-Band EQ consist of 62.5Hz, 100Hz, 160Hz, 250Hz, 400Hz, 630Hz, 1kHz, 1.6kHz, 2.5kHz, 4kHz, 6.3kHz, 10kHz, & 16kHz frequencies that can be adjusted from -9dB to +9 dB. The Q-factor of each frequency can also be adjusted to 1.35, 1.5, or 2.0
-
Drive EQ: The Drive EQ mode helps you hear your music over road noise. It boosts certain frequency ranges that become hard to hear due to road noise.
-
Stage EQ: Stage EQ virtually lifts the sound up to ear-level for better imaging inside your vehicle.
-
Audio Settings: The Kenwood Excelon KDC-X705 offers a variety of audio settings to further enhance your music listening experience.
Space Enhancer: The Spacer Enhancer widens the soundstage inside your vehicle.
Loudness, Bass Boost & Bass Extension: The Loudness feature boosts low and high frequencies to produce a well-balanced sound at a low volume level. The unit's Bass Boost enhances low bass frequencies at any volume level. There is also a Bass Extension feature which further enhances the unit's bass output at extremely low frequencies around 62.5Hz.

Update on 18 February 2023
I spent the day wrestling with the car, trying to install my new CD receiver. I removed the panel that Angel's team built to mount the DSP controller and a USB charging port, dismounted the controller and set it aside, and discarded the USB charging port. I used my Dremel 4300 rotary tool to cut a larger opening for the single-DIN sleeve. I love that tool, but I'm not by any stretch of the imagination very skilled with it. My cut lines aren't very straight, but the decorative fabric and the head unit's trim piece will hide my flaws well.
I struggled to run a yellow power line from the positive terminal of the battery to the yellow wire of the harness. The battery is in the boot, and sheet metal separates the boot from the passenger compartment, so I had to remove the backseat cushions to figure out how to pass the wire through. The bottom cushion came up and out easily with just a tug, since it isn't bolted down. In contrast, the armrest and headrest were real chore. I could not find the bolts, and I couldn't find a diagram in my service manual or online. Finally, I found a YouTube video that revealed the bolts' locations. Thank you, LegitStreetCars! I still had trouble with the bolts and could only remove one of them from the headrest, but it was enough to move it aside to see the sheet metal.
Once I did, I could see that Angel's team had already bored a hole through and passed some wires through, so I easily passed the yellow wire through the same hole and followed the same route under the cushions and carpets up to the dash. It's easy once you know how, but learning how on your own is very difficult. I added an in-line 10 amp fuse.
I spliced the existing red power line and black ground line from the USB charging port to the harness' red and black wires. The red wire already had an in-line fuse holder, but its fuse was only 2 amps. I'll need to go to the store for another 10 amp fuse.
It was dark by the time I started putting the cushions back in place, affixing the custom panel in its place over the glove box opening, and screwing a large rigid liner back in place to cover the right inner wall of the boot. There I was, on my back, almost completely inside the boot wielding my Phillips screwdriver against tiny screws, my arms at awkward angles, my hands cramping up. The battle took its toll on me, but I emerged victorious.
The war is not over. Sadly, the RCA cables I had obtained were not long enough, so I ordered a longer set, meaning I'll have to take apart the interior again in future. But for now, I have to get this car ready to be towed to British European Auto. I should have done today's work a couple of weeks ago. Oh, well.
Thank you, Tony and CJ, at Pro I-Net here in Hemet, for the parts and advice on how to wire my head unit. You guys are real professionals and good people.